How to install Netlify CMS on Vercel and Next.js
Netlify CMS is one of the best options when working with Statically Generated sites and Markdown. The only major downside is that it can be quite difficult to install outside of Netlify. So today we'll go over exactly how to set up Netlify CMS on Vercel with Next.js.
Recently I decided to move Ironeko from WordPress to a statically hosted site out of frustration of having to manage a web server. After looking at a lot of alternative CMS I finally settled for Netlify CMS, one of the very few to offer ownership over my content as well as a self-hosted solution without running an expensive LAMP server.
Once I started trying to get it to work on Vercel, my host of choice, I realised that it wouldn't be quite as easy as I'd thought. But I persevered and finally succeeded.
Here's how I managed to set up Netlify CMS on Vercel.
Initial steps
The first thing you'll want to do is open your Next.js project and create a new directory at /public/admin . This is where we will access our CMS from. Then, create an index.html file:
<!-- /public/admin/index.html -->
<!DOCTYPE html>
<html>
  <head>
    <meta charset="utf-8" />
    <meta name="viewport" content="width=device-width, initial-scale=1.0" />
    <title>Content Manager</title>
  </head>
  <body>
    <!-- Include the script that builds the page and powers Netlify CMS -->
    <script src="https://unpkg.com/netlify-cms@^2.0.0/dist/netlify-cms.js"></script>
  </body>
</html>
This will allow Netlify CMS to load its interface.
Configuring Netlify CMS on Vercel
Okay, this is where things get a bit more complex. Usually Netlify CMS uses endpoints made available by Netlify for managing login with third party providers like Github. In our case, unfortunately, we won't have those so we need to find a workaround.
Our configuration will live in a config.yml file:
backend:
  name: github # our repository provider
  repo: username/repository # username/repo
  branch: master # the main branch of our repo
  base_url: "https://example.com" # our site's base URL
  auth_endpoint: "api/auth" # used together with base_url for our custom endpoints (more on this later)
media_folder: "public/images" # the folder we want to upload new images to
public_folder: "/images" # the folder our images should be fetched from
collections: # our content types, this is just an example!
  - name: "pages"
    label: "Pages"
    folder: "_posts/pages"
    create: true
    slug: "{{title}}"
    fields:
      - { label: "Layout", name: "layout", widget: "hidden", default: "blog" }
      - { label: "Title", name: "title", widget: "string" }
      - { label: "Publish Date", name: "date", widget: "datetime" }
      - { label: "Body", name: "body", widget: "markdown" }
The main things to look out for here are:
- All the stuff in
backend - Both
media_folderandpublic_folder
Adding your environment variables to Vercel
Fundamental to getting Netlify CMS to work on Vercel is configuring your Github secrets correctly. You can create these from Your Profile > Settings > Developer Settings > OAuth Apps. Here you'll want to create a New OAuth App from the top right button and fill out the form:
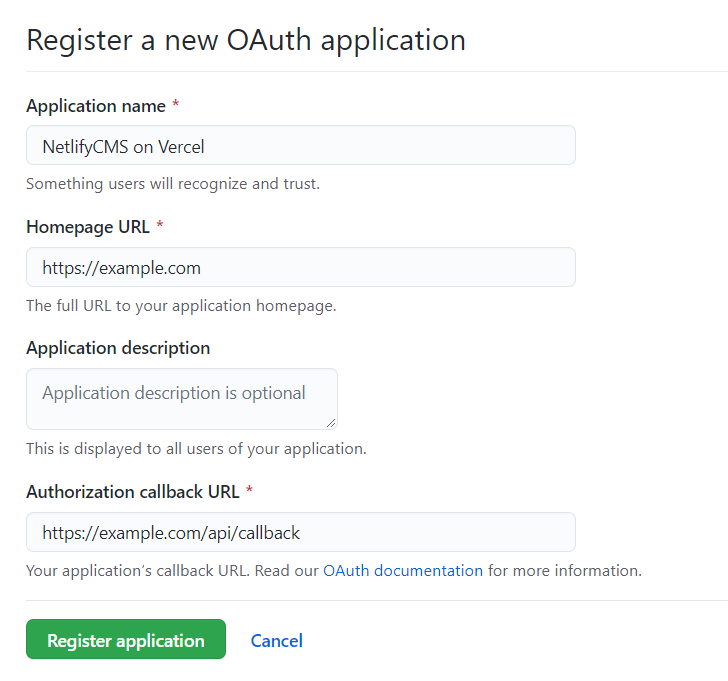
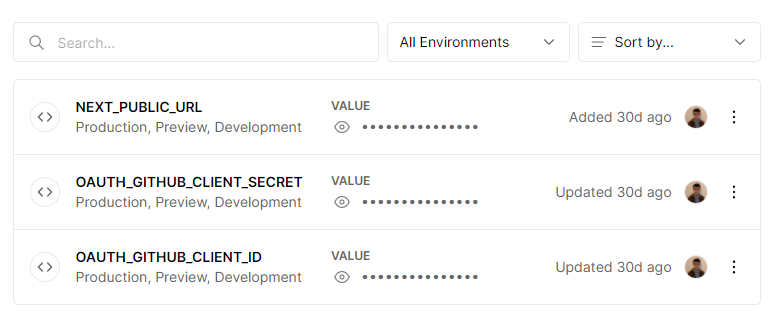
Once your app has been created you'll be able to view its secret values: CLIENT_SECRET and CLIENT_ID. Take these two values and add them to your Vercel project under Settings > Environment Variables.
Creating an auth endpoint to login into Netlify CMS on Vercel
Since we're going to pull Netlify CMS out of Netlify, we'll need to provide a custom endpoint to allow Netlify CMS to log us in. Thankfully Next.js and its built-in API routes capabilities are perfect for this. Let's do some initial setup by creating a new /lib folder in your project. Then let's create two new files:
// /lib/config.js

export const config = provider => ({
  client: {
    id: client[provider].id,
    secret: client[provider].secret
  },
  auth: {
    tokenHost: auth[provider].tokenHost,
    tokenPath: auth[provider].tokenPath,
    authorizePath: auth[provider].authorizePath
  }
});

const auth = {
  github: {
    tokenHost: "https://github.com",
    tokenPath: "/login/oauth/access_token",
    authorizePath: "/login/oauth/authorize"
  },
};

const client = {
  github: {
    id: process.env.OAUTH_GITHUB_CLIENT_ID,
    secret: process.env.OAUTH_GITHUB_CLIENT_SECRET
  }
};
This script will give us easy access to our environment secrets to login via Github.
// /lib/scopes.js

export const scopes = {
  github: "repo,user",
};
While this file contains information about what data from our Github account we want to share.
For our actual API route we'll create a new script in /pages/api/auth.js
// /pages/api/auth.js

import { AuthorizationCode } from "simple-oauth2";
import { randomBytes } from "crypto";
import { config } from "../../lib/config";
import { scopes } from "../../lib/scopes";

export const randomString = () => randomBytes(4).toString("hex");

export default async (req, res) => {
  const { host } = req.headers;
  const url = new URL(`https://${host}/${req.url}`);
  const urlParams = url.searchParams;
  const provider = urlParams.get("provider");

  // simple-oauth will use our config files to generate a client we can use to request access
  const client = new AuthorizationCode(config(provider));

  // we then make a build the request to our provider
  const authorizationUri = client.authorizeURL({
    // your callback url is important! More on this later
    redirect_uri: `https://${host}/api/callback?provider=${provider}`,
    scope: scopes[provider],
    state: randomString()
  });

  // and get redirected to Github for authorisation
  res.writeHead(301, { Location: authorizationUri });
  res.end();
};
If you've ever worked with OAuth you probably know how fickle it is. So we'll let simple-oauth2 do most of the work for us here. Essentially all we're doing is creating our request to Github and then redirecting people to the correct page to authorise it!
Thanks to having previously set our Netlify CMS config to auth_endpoint: "api/auth" , any login request will automatically be redirected to the endpoint we just created.
All we have to do now is create our callback page:
import { AuthorizationCode } from "simple-oauth2";
import { config } from "../../lib/config";

export default async (req, res) => {
  const { host } = req.headers;
  const url = new URL(`https://${host}/${req.url}`);
  const urlParams = url.searchParams;
  const code = urlParams.get("code");
  const provider = urlParams.get("provider");

  // we recreate the client we used to make the request
  const client = new AuthorizationCode(config(provider));

  // create our token object
  const tokenParams = {
    code,
    redirect_uri: `https://${host}/api/callback?provider=${provider}`
  };

  try {
    // try to create an access token from the client
    const accessToken = await client.getToken(tokenParams);
    const token = accessToken.token["access_token"];

    const responseBody = renderBody("success", {
      token,
      provider
    });

    res.statusCode = 200;
    res.end(responseBody);
  } catch (e) {
    res.statusCode = 200;
    res.end(renderBody("error", e));
  }
};

// This renders a simple page with javascript that allows the pop-up page
// to communicate with its opener
function renderBody(status, content) {
  return `
    <script>
      const receiveMessage = (message) => {
        window.opener.postMessage(
          'authorization:${content.provider}:${status}:${JSON.stringify(
    content
  )}',
          message.origin
        );
        window.removeEventListener("message", receiveMessage, false);
      }
      window.addEventListener("message", receiveMessage, false);
      window.opener.postMessage("authorizing:${content.provider}", "*");
    </script>
  `;
}
Here we get a an authorisation token and send it to our CMS so that we can view the protected pages.
Testing Netlify CMS on Vercel
Don't forget that in development Netlify CMS still uses Netlify for login. Because of this you can't be sure the CMS actually works until you've made a deployment.
Navigate to https://yoursite.com/admin, click on "Login with Github", login through the pop-up that will appear and once that's done you should be automatically redirected to the main page of your new working Netlify CMS on Vercel!
Wondering how to improve your Next.js blog performance? Check out our guide on using the Next.js Image component from markdown.