How to set up a CI/CD pipeline to an Ubuntu server with Github
CI/CD pipelines are a cornerstone of modern web development. Unfortunately if you can't afford an Azure or AWS server it's not always clear how to implement them. In this article we'll go over how to create a CI/CD pipeline with Github and a simple Ubuntu server.
Preface
Before we get into the solution I want to make it clear that we will not be using any outside dependencies outside of Ubuntu and Github. This guide is meant to be specifically for small teams who need a lightweight pipeline implementation with no overhead.
Why do I need a CI/CD pipeline?
In modern web development, avoiding as much human error as possible is extremely important. This is especially true if you're working with Node.js applications, where downloading dependencies and building software are involved.
Ideally you probably don't want to upload files manually via ftp as people used to do back in the day as it's very likely something will go wrong.
This is where Github (and other code repositories like Gitlab) come to the rescue. Hosting your code remotely means it's very easy to sync your server with the latest changes and put your website/app online.
The downside is that if you're on a standard Ubuntu server that you access via terminal, that still requires you to login and sync your code with Github manually every time. It's annoying and time consuming.
The server setup
Our server is pretty standard. In my situation it's an Ubuntu server I rent from Digitalocean, but any Linux server will do. You'll need to be able to access the terminal interface. This can either be via SSH or with a web-interface.
This guide is primarily Node-focused and I assume you already have the basics, such as Node.js and Git, installed.
However, the non Node-specific parts of the guide should be useful to create a pipeline with any environment.
Installing a process manager
To run Node.js applications in the background I use PM2. This allows me to easily stop, start and reload running applications from the command-line. It also provides me with some basic information about the processes it's running.
Starting programs with PM2 is fairly easy. For npm scripts they usually look something like this pm2 start npm --name "<your-app-name>" -- start.
Other options are Forever as well as Supervisor. Feel free to choose whichever one you prefer as it won't make much difference in the grand scheme of things. I will be using PM2.
Setting up access to your server
Github will need access to your server during the deployment process. While this will be done securely and none of the passwords will be publicly shown you'll probably want to still take some security measures.
There are two ways Github can access your server:
- Via username/password combination
- Using an SSH key
Setting up user/password
My first piece of advice here both methods is do not use a root account. (A root account being the default account created when you start your server.) It has administrator permissions and if it falls into the wrong hands it could be extremely bad.
I suggest you create a Github-specific (non-sudo) user on your server and use that user specifically to deploy your apps, but really any existing or new user will work as well.
Setting up SSH keys
SSH keys require some more advanced knowledge of Linux systems, so to set it up I suggest you follow the official SSH Keys setup from the Ubuntu docs.
Set up your Github repository on the server
With the new user you created (or using an existing one), make sure you've set up your remote repository in a folder the user you're planning to login with has access to. I usually put my repositories in my home folder /home/<your-username>/ since it's the default folder whenever I login.
If you repository is private you might want to set up SSH keys to connect to Github so you won't need to input your password every time.
Once all that is done, clone your repository inside your home directory with git@github.com:<github-username>/<repository-name>.git, so that you'll be able to easily access it from /home/<your-username>/<your-repository>.
That's all you'll have to do on your server!
Setting up Github's CI/CD pipeline with Github Actions
Our pipeline is going to be built around Github Actions - yaml files that define specific actions Github will take after you push code to your repository.
If any of the steps inside your pipeline fail the action will stop and notify you via email, this means it's the best place to catch any errors before your program goes live to the public.
Let's break down what your pipeline should contain.
Installing, building and testing
This should go without saying but you should install and build your app. If there are any obvious problems they will probably be caught here, in any other case you'll be able to use the build to run any automated tests.
Running automated tests
If you're not testing your app, this might be the time to start! As your code base grows, stuff will inevitably break and you simply won't be able to catch all the problems and edge cases by manually testing.
I'm not going too much into specifics about the benefits of testing here, but if you're planning to implement an automatic pipeline you need to do automated testing.
Syncing your server with your repository
If your app builds and all tests pass successfully the pipeline will move on to the next job. "Syncing" is perhaps the wrong word for this - all we'll do is login into the server and execute commands to pull changes from Github, build and then put the app online.
Setting Github secrets
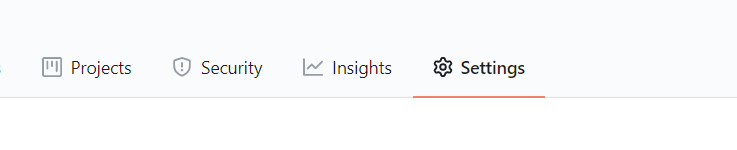
This is probably the best time to add your secrets (username, host and password) into your Github secrets. Navigate to the "Settings" tab of your repository.
Then navigate to the "Secrets" pane on the left:
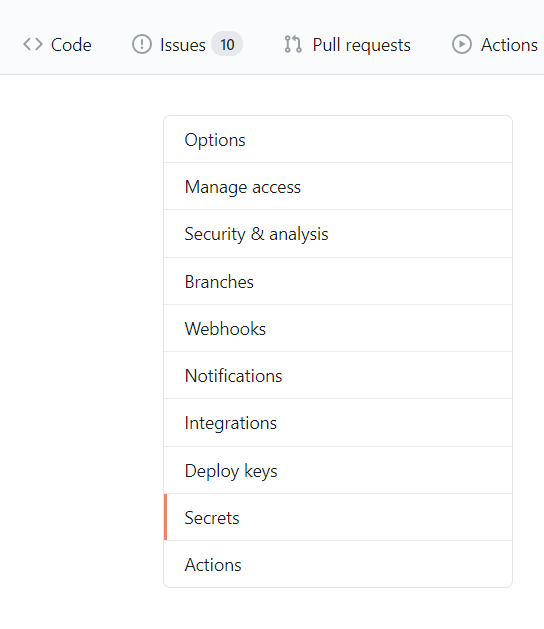
Here you'll be able to add secrets to your repository. They'll depend on the way you plan to login into your server. You can find more information about the options on the ssh-action repository. Since my server didn't accept SSH keys for some reason, mine are:
- Host: The IP of your server.
- Username: Your user's username.
- Password: The password of the user you want to login as.
- Port: The port SSH is exposed to on your server, this is usually 22.
That said, my pipeline for Ironeko looks like this:
name: Node.js CI/CD

on: [push] # tells github to run this on any push to the repository

jobs:
  test: # names the job
    runs-on: ubuntu-latest # sets the version of linux we want to use, should be what you have on your server

    strategy:
      fail-fast: false # tells github to not run further steps if this one fails
      matrix:
        node-version: [12.x] # sets the version of node we want to use, should be what you have on your server

    steps:
      - uses: actions/checkout@v2 # fetches your commit to test it
      - name: Use Node.js ${{ matrix.node-version }} # names our step
        uses: actions/setup-node@v1 # downloads node and npm
        with:
          node-version: ${{ matrix.node-version }}
      - run: npm install # installs your dependencies
      - run: npm run test # builds your app
      - run: npm test # runs your test suite
        env:
          CI: true # shows terminal output!

  deploy:
    runs-on: ubuntu-latest
    needs: test # this job depends on "test" having finished
    if: github.ref == 'refs/heads/master' # we tell Github to only execute this step if we're on our master branch (so we don't put unfinished branches in production)
    steps:
      - name: Deploying to Digitalocean droplet
        uses: appleboy/ssh-action@master # An action made to control Linux servers
        with: # We set all our secrets here for the action, these won't be shown in the action logs
          host: ${{ secrets.HOST }}
          username: ${{ secrets.USERNAME }}
          password: ${{ secrets.PASSWORD }}
          port: ${{ secrets.PORT }}
          script: |
            cd <your-app-folder> # we move into our app's folder
            git pull # we pull any changes from git
            npm prune # we remove any unused dependencies
            npm install # we install any missing dependencies
            npm run build # we build our app
            pm2 reload all # we reload the app via PM2
Obviously the commands you launch will be different depending on the app you're trying to deploy and which process manager you chose at the start of the guide, but everything else should be the same.
Conclusion
While this guide may seem fairly simple, I had a hard time looking for alternatives. Most blogposts and tutorials I've found on the matter suggest you install a third party automation server that most small to medium apps simply don't need.
If you're like me and have a lot of small deployments on a single server, this guide will probably save you a lot of time and pain in the long run.
Looking to host your app on an Apache web-server? Check out our How to deploy node apps to Apache guide!